The photo essay is tough. It is a project that requires not only creativity and an eye for storytelling, but one that involves a lot of work and most importantly, careful planning. This is one reason why I recommend going into a photo essay with a shot list or a checklist of things you want to make sure that you take away once the session is over.
The problem with this is that if you build yourself a list of shots prior to the day that you’ll be taking the photos, it leads to the idea that a photo essay is sort of a formulaic thing. So, my best piece of advice is to keep that thought in the forefront of your mind, the idea that even though you’ve written out a formula, the formula does not necessarily need to be followed in the end.
In other words, make yourself a list of shots so that you don’t forget anything that you may want as you wrap up the project. Don’t make the list with the thought that these are the shots that absolutely must be present in the final essay.
With all of that said, let’s take a look at how to go about building a shot list for a photo essay. Because this art form is documentary in nature, it sometimes helps to approach it from the perspective of videography. Think about your favorite documentaries and how the videos are shot, how the stories are told. Use that as your guide to creating a similar kind of story but in still images. To help guide you, I’ve prepared a quick list of shots that I like to make sure I take whenever I work on photo essays.
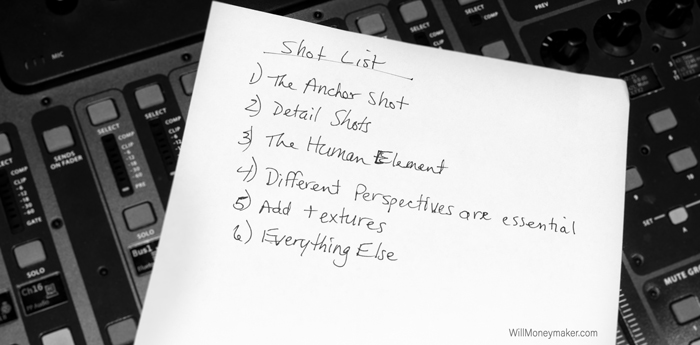
1. The Anchor Shot
The anchor shot is also sometimes referred to as the establishing shot. This is the image that starts your story. It sets the stage, the tone, for everything that comes after. If you watch documentaries, then this would be the wide, panning sweep at the beginning of the documentary, the sweep that shows the entirety of the location, the people that will be involved, that sort of thing.
For photographers, this is the shot of the space in which you will be working. To use an example, let’s say that you are telling the story of a farmer working in his fields. Your anchor shot will be the one in which you capture the farmer himself, the tools that he is working with and a wide sweep of his farm as the backdrop — or something similar to this, anyway. Whatever is necessary to tell your audience exactly who and what the rest of the story will be about.
2. Detail Shots
No story, written, photographed or captured on video, is complete without the details. To create this shot, pour over your scene and search for all of the interesting details, making sure to photograph them exhaustively. In the example of the farmer, for instance, you may collect shots of tools individually or a close-up of grain ripening on the stalk. Make sure to take as many of these types of images as you can. Though you will only choose a small handful of these to add to the finished project, the more shots you have, the more flexibility you will have as you put the essay together.
3. The Human Element
Stories nearly always involve people in some way to make sure to capture the people involved in a way that adds to the story. Don’t simply create posed shots. Create candids in which your subject is actually, physically doing the thing that you are telling the story about. Your farmer, for example, maybe on his tractor, harvesting his grain. Or, perhaps he is working on that tractor, making some repair to prepare it for the harvest.
4. Different Perspectives are Essential
Different perspectives of the shots you have already taken serve to help enrich the story by providing even more detail, even more, information about the things that are happening within the story. This is particularly important for your main subjects, the people in your photos, but it also helps to look at all of your shots this way. Once you’ve added the human element and once you’ve taken your anchoring shot, think about the different perspectives in which you might create alternatives to these shots. Look over the farmer’s shoulder or climb up on that tractor with him to take a photograph over the steering wheel so that you are seeing what he sees. It varies from one essay to the next but be aware that different perspectives are nearly always possible and always valuable additions to the finished project.
5. Add Textures
Texture is a powerful storytelling tool, at least in the visual arts. In the case of our farmer, perhaps he has calloused, oil-stained hands that tell a tale of long hours working on his tractor. Perhaps the tractor itself has spots of rust and roughened paint, which illustrates the many long years the machine has operated in sun, wind, and rain. Though textures are no more than simple patterns, you can see how they add life to the finished story. Make special note of textures as you are working through the scene.
6. Everything Else
Once you’ve completed the rest of the shots that I’ve listed, think about what else you may want to photograph. What else can possibly add to the story? Don’t be shy about taking dozens or hundreds of photographs. The more raw material you have to work with, the better equipped you will be to tell the story thoroughly. Back to our example of the farmer, perhaps it is worthwhile to take photographs of the harvesting machinery in motion so that you can capture the cloud of dust rising from the machine as it harvests the grain. Or perhaps you would like an image of the farmer pouring harvested grain through his fingers, his crop harvested and ready to be sold. You may have the first five shots but there are always more things that are easily overlooked if you’re not watching for them.
Treat this list of shots as more of a suggestion rather than a concrete rule that must be followed at all costs. All stories unfold differently, which means a shot list helps you make sure you don’t forget anything but it likely won’t contain a listing of every shot that you might want.


